Manufacturers invest heavily in product and brand, yet the moment of truth happens at the filler. Overfilling quietly erodes margin, underfilling risks compliance issues and customer complaints, and inconsistent fills weaken shelf appeal and trust.
Liquid filling is where precision meets speed. When the line is designed well and run with discipline, it delivers the right amount of product into every container, at the rate the business needs, without surprises.
What Is the Liquid Filling Process?
At its core, liquid filling is controlled product transfer. A measured amount of fluid moves from a supply system into a container to a target volume or weight while conditions remain stable and verified. The operation touches product quality, compliance, and cost in a direct way.
A modern line surrounds the filler with supporting stages. Upstream steps prepare the product so it behaves predictably. Container handling cleans, orients, and positions each bottle under the nozzles. After the fill, capping and sealing protect against leaks and contamination. Labeling and coding add traceability, while the inspection process removes defects before packing and palletizing.
5 Steps in the Liquid Filling Process
A reliable liquid filling process is a chain of events that sets each other up. Preparation makes the liquid stable and predictable. Container handling puts a clean, correctly aligned package under the nozzles. The filling method then matches the fluid and the package. Capping and sealing protect what went in, and labeling and coding make every unit traceable and market‑ready.
Together, these five steps form a single, interlocking process: stabilize the liquid, present a ready container, fill with the right method, secure the closure, and make the unit identifiable. When each stage does its job, the line runs smoothly and every bottle in the case matches the spec.
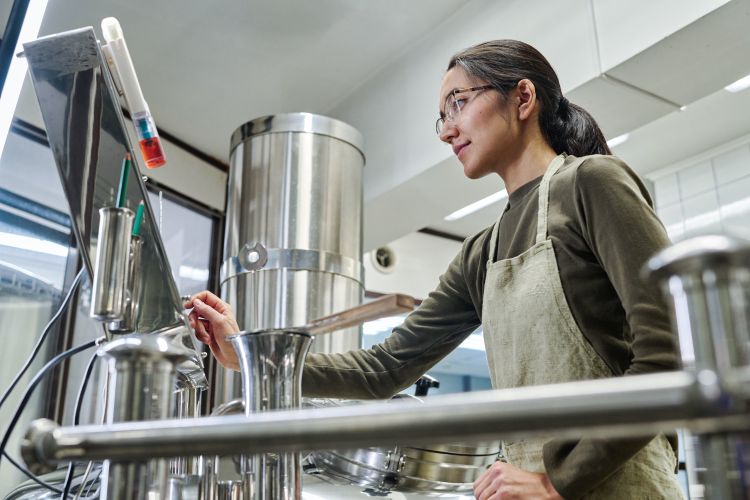
Step 1: Product Preparation
The product preparation stage shapes how the liquid will behave on the line. It builds uniformity, protects equipment, and establishes the controls that keep a run consistent from first bottle to last.
Receiving & Batching
Ingredients arrive with lot identifiers that anchor traceability. During batching, operators confirm the recipe, measure each input, and record the lot codes; those identifiers travel with the product through labels and electronic records. The outcome is a batch that can be followed, audited, and, if needed, investigated end‑to‑end.
Filtering
Filtration removes stray solids and shields pumps, valves, and nozzles. Lines commonly use bag or cartridge filters sized by mesh or micron rating. Coarse stages keep flow healthy and equipment safe; where particulates are intentional, pore sizes are opened up or a bypass is used, and the filler is built to pass chunks without tearing them apart.
Blending & Homogenization
Blending evens out color, flavor, and active ingredients so every container matches the last. Homogenization can reduce droplet size for a smoother, more uniform texture. Recirculation loops keep that uniformity during long runs, preventing stratification in the supply tank.
Temperature & Viscosity Conditioning
Temperature governs viscosity, foam, and flow. Warming a thick product lowers resistance and speeds dispensing; cooling a foam‑prone product calms the surface. What matters is stability—holding a tight temperature window so early and late bottles behave the same way.
Degassing & Deaeration
Air dissolved in the liquid or trapped as bubbles creates foam, inconsistent levels, and oxidation risks. Mechanical agitation, vacuum deaeration, or nitrogen sparging reduce gas content. With less air, fills are cleaner, induction seals seat more reliably, and net contents stay consistent.
Calibration & Validation
Controls only work when their measurements are trustworthy. Plants run scheduled calibrations for scales, flowmeters, level sensors, and thermometers. Before a run, recipes and tare values are verified. Cleaning procedures—such as validated clean‑in‑place (CIP) or steam‑in‑place (SIP) systems—establish the hygienic baseline.
Step 2: Container Handling
Even perfectly prepared product will fail in a dirty or misaligned container. This step presents each package to the filler cleanly, steadily, and in the exact position required.
Infeed, Unscrambling, & Cleaning
Containers arrive in bulk or trays. Unscramblers orient them and feed a steady, singulated stream. Additionally, clean container walls are required because they mean better label adhesion and fewer inclusions under the cap. Surfaces are cleared of dust and fibers, often with ionized air or a nitrogen purge; in more controlled environments, a sterile water or alcohol rinse is used.
Positioning & Indexing
Starwheels, rails, and clamps set height and spacing so every bottle meets the same datum points. Photoeyes confirm presence and orientation. Interlocks enforce the simple “no container, no fill” rule, preventing spills, keeping equipment clean, and avoiding product loss.
Neck & Nozzle Alignment
The geometry between finish and nozzle controls splash and foam. Top‑fill works for calmer liquids; bottom‑up filling keeps the nozzle just below the rising surface to cut turbulence. Anti‑drip features and diving nozzles finish the dispense cleanly and protect the finish area so closures seat squarely.
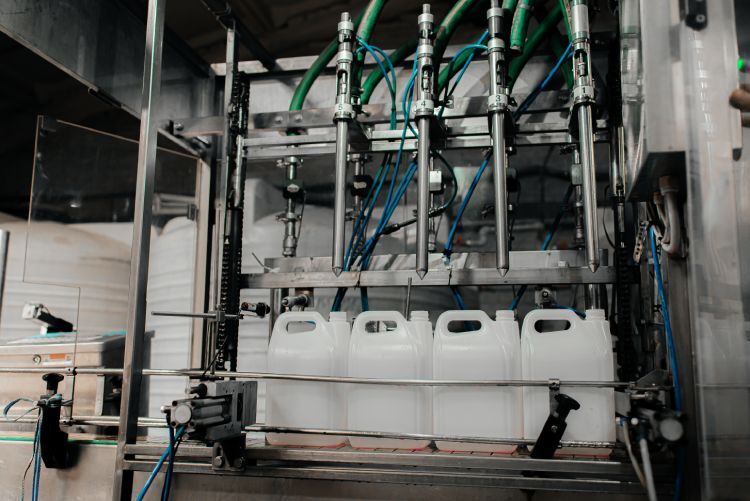
Step 3: Filling
Here, precision meets speed. The chosen filling method must match fluid behavior and package design, while controls keep every head performing like the others.
Method Selection
Different liquids call for different approaches. Gravity and pressure systems suit thin, free‑flowing products; piston or gear systems move viscous formulas; vacuum filling supports rigid containers; mass‑flow or magnetic‑flowmeter systems deliver tight volume control; net‑weight systems target exact contents by weight; and overflow fillers create a uniform sight‑level where appearance matters. The method is selected to fit viscosity, foaming, particulate size, tolerance, and container style.
Dispensing Mechanics
Valves and nozzles meter the stream and stop it without strings or after‑drip. Laminar, clean‑breaking designs handle thin products; positive shutoff styles manage thicker mixes. Output scales by adding heads, and servo motion on pistons and diving nozzles repeats the same path, speed, and stop point every cycle.
Monitoring & Control
A programmable logic controller (PLC) stores the recipe (times, volumes, motion profiles, etc.). Sensors and, in some cases, load cells provide feedback. Checkweighers and vision systems sample containers during the run and flag drift, enabling quick corrections that keep the lot within spec.
Hygiene & Safety
Product‑contact parts use sanitary materials and smooth finishes to avoid harborage points. Quick disconnects simplify teardown when CIP isn’t used. Where alcohols or other solvents are present, explosion‑proof construction and ventilation bring the line into compliance with safety codes.
Changeover
When the product or package changes, so does the setup. Tool‑free parts, labeled guides, and saved recipes compress the changeover window. Digital work instructions standardize the sequence so the next run starts on target.
Step 4: Capping & Sealing
Whether a cap or a seal, the closure protects what’s inside the container and keeps it there through warehousing, transport, and use. This stage locks in integrity and prevents leaks across the supply chain.
Cap Selection
Closures are matched to the neck finish and product: roll-on pilfer-proof (ROPP), lug, screw, snap, pumps, triggers, or droppers. Liner materials interact with the formulation, so compatibility prevents paneling, leaks, and flavor or odor transfer.
Application
Cappers apply closures to a defined torque or application force to create the intended seal. Induction or heat sealing adds a hermetic layer and supports tamper evidence where required. Together, torque and seal form the barrier against oxygen ingress and shipping stresses.
Verification
Results are checked continuously and at defined intervals. Torque tests confirm application, sensors verify cap presence, and vision systems catch cocked caps or missing components. For sensitive products, vacuum or pressure tests validate the integrity of the seal.
Step 5: Labeling & Coding
Labels and codes make the package market ready and traceable. They also influence perceived quality on the shelf. This final stage gives the package its identity, communicates what it is, and ties it back to the brand that produced it.
Label Application
Wrap, front‑and‑back, neck, and shrink label formats each require precise placement. Adhesive and facestock are paired with the container’s material and texture. Controlled web tension and consistent wrap speed keep edges straight and surfaces smooth.
Coding & Marking
Lot codes, dates, and serialization link each unit to its history and destination. Inkjet, laser, or thermal transfer systems are selected to match the surface, and durability needs so prints stay legible where the product will live and move.
Final checks
Vision systems confirm label position and print quality. Barcode grading verifies scan reliability. Reject stations remove nonconforming units before case packing so downstream equipment runs without interruption.
Common Liquid Filling Methods
The right method makes filling feel easy. The wrong one creates constant adjustments. What type of liquid filling machine you use depends on how the product flows, whether it foams, if it contains particulates, the accuracy target, and what the container demands visually.
Gravity Filling
Gravity filling systems let product flow from an elevated tank into containers. The appeal is simplicity and gentle handling. With stable head pressure and well-sized nozzles, gravity produces consistent results for thin- to medium-viscosity products that do not foam much. Many cleaners, waters, and beverages run well this way.
Limits show up with very thick or very foamy products. Because gravity depends on height and time, variation in head pressure can affect volume. Operators manage this limitation by keeping the supply level steady and by using precise timing and level controls.
For teams that value low maintenance and easy cleaning, gravity is often the most economical fit.
Pressure & Overflow filling
Pressure systems use a pump or a pressurized tank to push product through the nozzles. In an overflow design, any excess returns through the nozzle to the reservoir so every bottle shows the same visual level. It’s especially useful for clear containers where appearance matters as much as net contents.
Because pump energy helps deliver the product, pressure systems reach higher speeds and can control foam with bottom up filling. They do introduce more plumbing and sometimes more shear, so pump choice and settings matter for shear sensitive formulas.
When level appearance is important and the product is not very viscous, pressure overflow is a strong option.
Vacuum Filling
Vacuum filling creates a pressure difference that draws product into the container until it reaches a fixed level, then returns excess to a reservoir. The effect is a clean, repeatable meniscus and very little aeration. It is well-suited to glass bottles, fragrances, edible oils, and certain solvents.
The method relies on the container’s strength and on product flow under reduced pressure. Very thick or chunky products are not a good fit.
When level control is critical and low foam is a priority, vacuum systems provide a refined finish and stable performance.
Piston Filling (Volumetric)
Piston systems measure volume mechanically. A piston retracts to draw product into a cylinder, then extends to push that exact volume through the nozzle. Modern servo drives make the motion precise and repeatable, which is why piston filling works across a wide range of viscosities.
This approach shines with gels, creams, sauces, and formulas that include particulates.
The product path is short and gentle, which protects inclusions. Preventive maintenance on seals and cylinders keeps accuracy high. During changeovers, operators adjust stroke or swap cylinders to match new fill volumes, then verify with quick checkweighing before ramping to full speed.
How to Choose the Right Filler for Your Product
Selecting the right filling equipment is as much about understanding your product as it is about knowing your production goals. Every filler type—from gravity and piston to overflow and vacuum systems—excels under specific conditions. To make the right decision, slow down and define what your product needs to look like, feel like, and perform like in the hands of the customer. Then translate those insights into equipment capabilities that deliver consistent, scalable results.
Frame the Discovery with the Right Questions
Before evaluating specific machine types, frame your requirements through the lens of the product and the package. Answering the following questions will help structure your discovery process:
- What is the viscosity range across the expected temperature span?
- Does the product foam or contain particulates?
- What container types and sizes are required, including the neck finish?
- What are the fill volumes and tolerances by stock-keeping unit (SKU)?
- Are there environmental constraints such as cleanroom or hazardous location?
- What are the throughput targets, and how will the line scale over time?
- What cleaning approach is required, for example CIP or manual disassembly?
- What budget, operating cost, and payback targets will define success?
Each answer helps narrow the field of suitable technologies. The more clearly you define these variables, the easier it becomes to match mechanical precision with product behavior.
Whether you’re working with a thick lotion, a carbonated liquid, or a particulate-rich sauce, this early discovery ensures that your eventual choice of filler aligns with both product integrity and operational efficiency.
Match the Method to the Product
Once your requirements are defined, evaluate which filling principles best match your product characteristics. For liquids that change viscosity with temperature, plan for conditioning or recirculation and choose a system that tolerates variation. Products that foam or release fragrance benefit from bottom-up or level-based filling to produce a clean, repeatable meniscus. If the formula includes particulates, favor volumetric options like piston or servo-driven fillers that can handle inclusions without damaging them. For transparent containers, where shelf appeal matters, overflow or vacuum systems ensure every bottle maintains a uniform visual fill level.
The key is to recognize that precision and presentation are not competing goals. The right method delivers both—protecting the product’s physical qualities while reinforcing the brand’s visual consistency.
Account for Container & Closure
Container geometry, material, and closure style influence critical design choices such as nozzle spacing, dive depth, and the type of capper required. Premium packaging with tight tolerances may demand real-time feedback systems like checkweighers or mass flow sensors to verify each fill meets exact specifications.
Chemical compatibility must also be considered. Products containing alcohols, solvents, or other reactive ingredients may require explosion-proof (ex-proof) construction and contact materials rated for chemical resistance. Ignoring these factors can compromise performance, safety, and regulatory compliance.
When filling systems, containers, and closures are selected in tandem, the result is a smoother operation with fewer adjustments and higher first-pass yield.
Plan the Line as a System
After finalizing the filling method, think holistically about integration. The filler must operate in sync with upstream and downstream components—cappers, labelers, coders, conveyors, and inspection systems—so the line performs as a unified system. Quick, repeatable changeovers depend on modular change parts, stored recipes, and clear documentation that eliminates guesswork.
The best-designed lines anticipate future needs: increased throughput, new packaging formats, or product extensions. By planning with scalability in mind, you invest not only in a piece of equipment but also in a foundation for long-term growth.
Contact Oden Machinery for High-Quality Liquid Filling Machines
At Oden Machinery, we specialize in supplying used liquid packaging equipment that meets the highest standards of quality, performance, and reliability. Every machine is thoroughly inspected, refurbished, and supported with expert service to ensure your production line operates smoothly and efficiently.
Whether you’re looking for a single filler or a complete packaging system, we have the equipment and expertise to match your needs.
Contact us today to learn more about our available inventory of liquid filling machines and find the perfect solution for your operation.